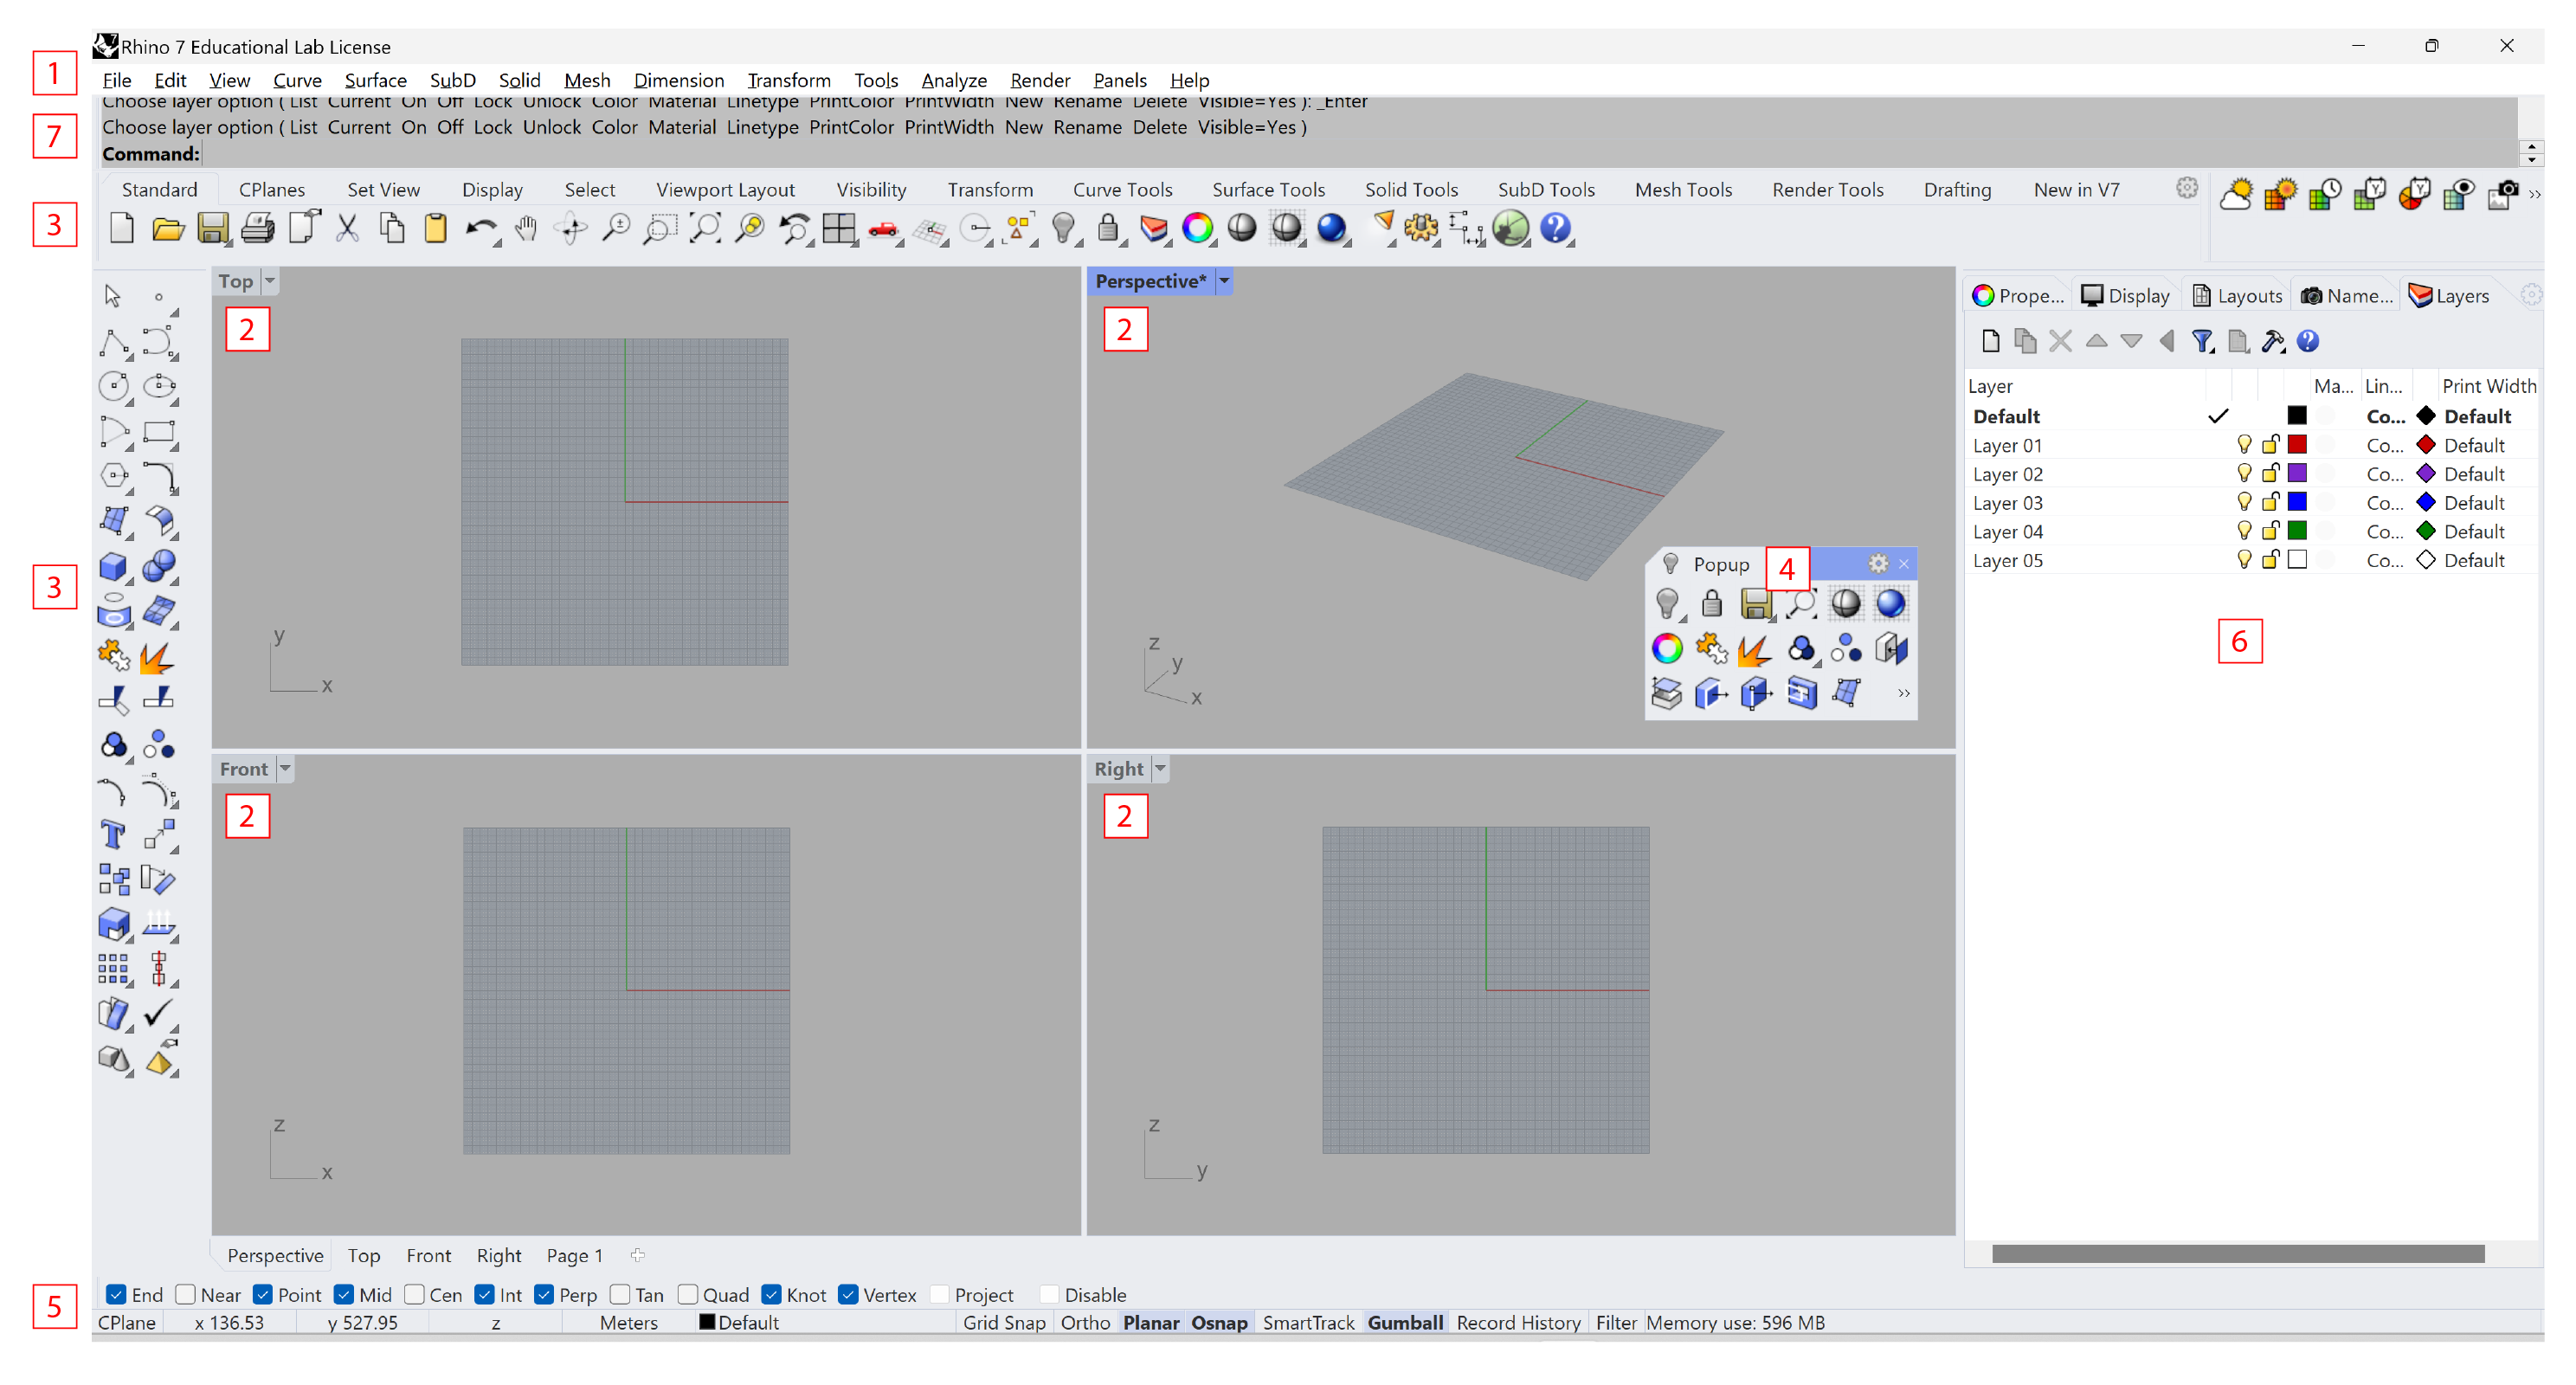
Interface

- Menu Bar - Access commands, options and document properties (e.g. model units).
- Viewports - Display different views and modes within the graphics area.
- Toolbar - Lists modelling tools.
- Popup Toolbar - Allows quick access to frequently used commands and tools
- Status Bar - Displays options, toggles and coordinates.
- Panels - Display specific panels such as layers, object properties, cameras etc.
- Command Line and History Window - Enter commands, get feedback, prompts, and options for the active command.
Viewports
Viewports serve as windows within the graphics zone, showcasing various views of your model in distinct display modes. By default, Rhino presents a layout consisting of four viewports. These display the perspective, top, front, and right views of your model.
Those viewports can be docked or floating and customized to any rectangular size and shape. The positioning of viewports is also adjustable to one's preference. For a more focused view, simply double-click the viewport title. This action toggles between the standard size and an expanded view that encompasses the entire graphics area.

The window-like 'Viewport' icon can reset the viewports to default 4-viewports layout, and you can find more layout of vieports in the corresponding flyout toolbar.

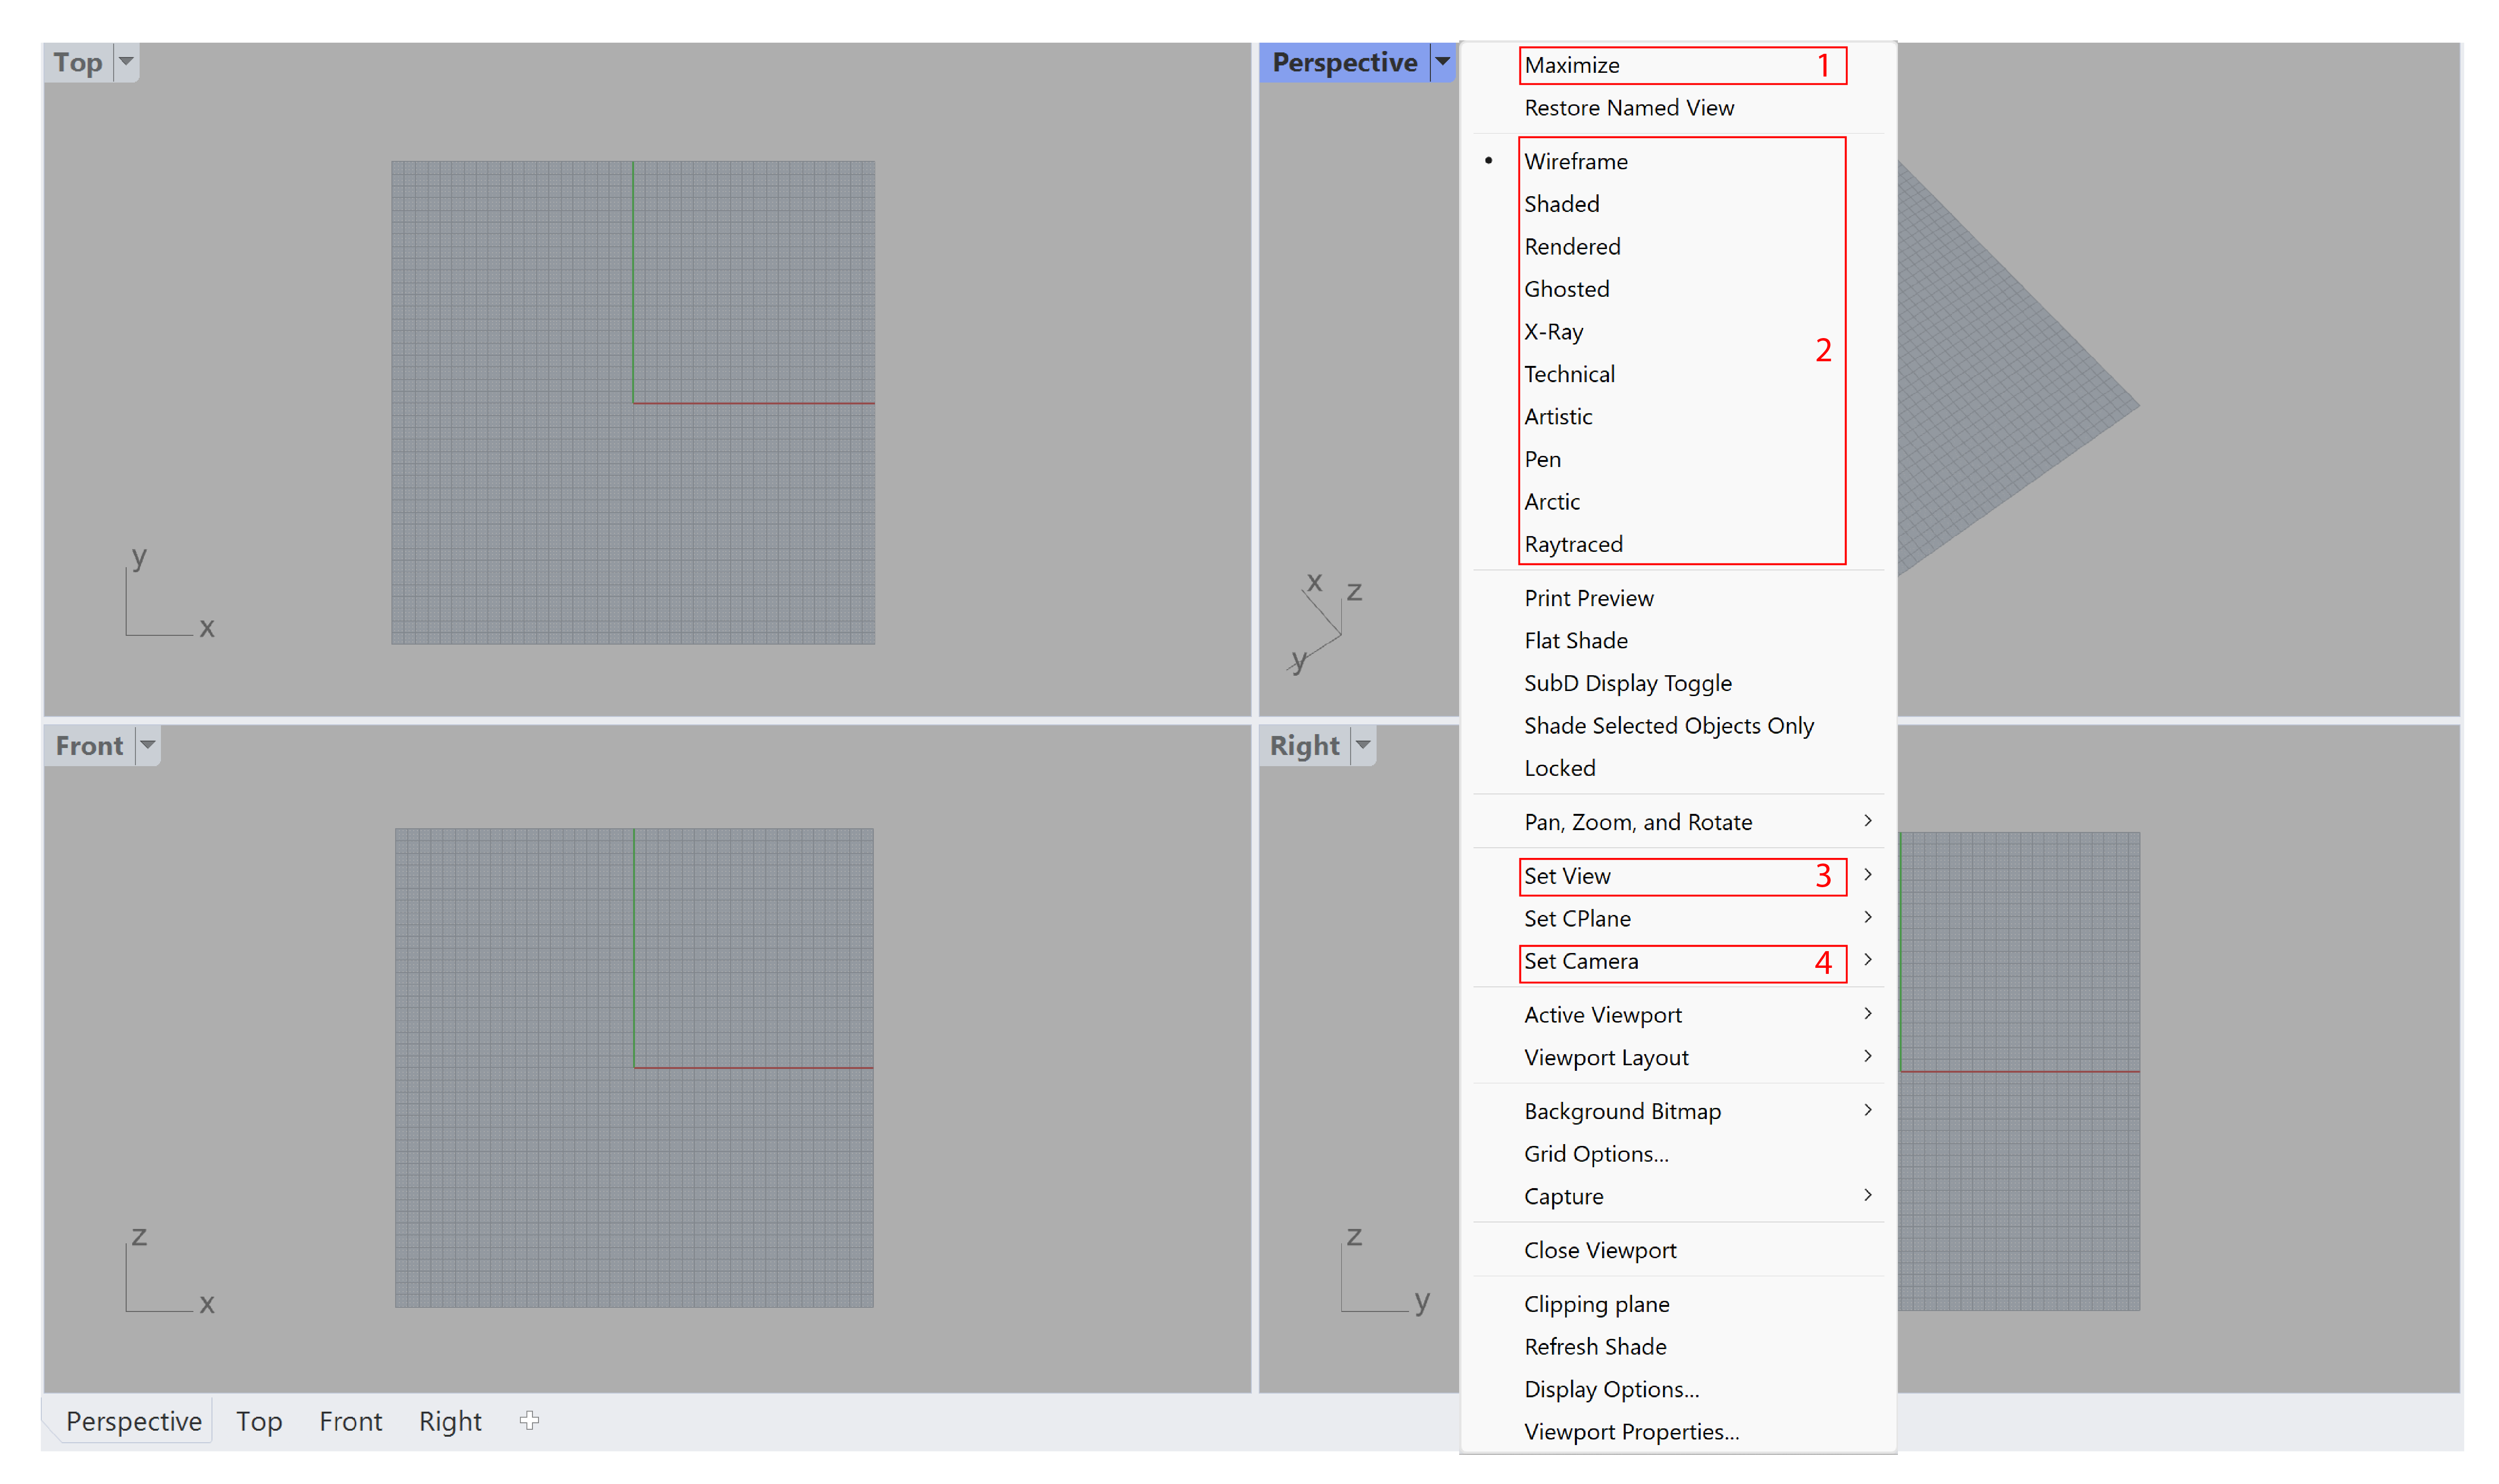
Right-clicking the viewport title (or clicking the triangle icon besides the title) allows more options on the viewports, which mainly includes:
- Maxmize/Restore the viewport (Equivalent:
double-clicktitle)- Change Display Mode (e.g. Wireframe, Shaded, Rendered, etc.)
- Set View (e.g. Perspective, Two Point Perspective, Isometric, etc.)
- Set Camera
Display Modes
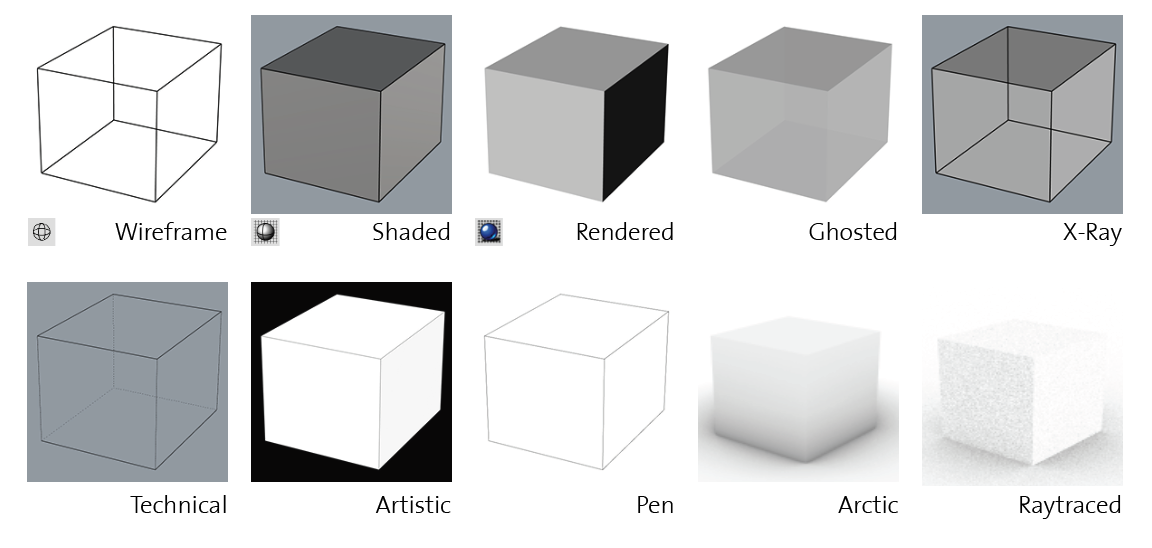
Display modes determine how the viewports presents the 2D and 3D geometry, which gives a visual aid for understanding and showing the geometry. Some commonly used display modes and their appearance are summarized below. You could also customize your display modes or import them from external sources. More info could be found here.

This icon allows swithching between the Wireframe mode and Shaded mode. More display modes can be found in the flyout toolbar.

Default display modes
Note: Each display mode configures objects to appear differently. In the
Renderedmode, points and curves are typically hidden by default. TheShadedmode displays all objects, but shadows are omitted. During the modeling process, modes such asWireframe,Shaded, andX-rayare often preferred, as they display all objects within the model. To modify and personalize these settings, navigate to theDisplaytab under the Panels section.
Toolbar
The toolbar serves as a visual collection of tools and commands that allows users to quickly and conveniently access the functionalities they need. Toolbars offer an alternative to using the command line by providing icon-based shortcuts to many of Rhino's functions.
There are several toolbars in the default interface. The horizontal toolbar below the command line is organized by sections and lists all the tools in rhino, including the tools from other plugins; while the vertial one (sidebar) at the left side is linked to standard toolbar group which shows the commonly used tools in Rhino.

Tool Interactions: The majority of tools activate with a
left-click. However, certain tools have supplementary functionalities accessible viaright-click. When hovering the mouse over a tool icon, a tooltip emerges detailing its functions. This tooltip will clarify the distinct actions for both left and right-click interactions.
Flyout Toolbar
The clickable small "triangle" in some buttons will extend all tools in the same catalogue.

Flyout toolbar of cascade
visibility.
Popup Toolbar
Popup toolbar is the toolbar activated by clicking the default middle-button on your mouse, which allows you to access the tools very conveniently. The main benefit of popup toolbar is that you can customize it easily. You can also import or export your popup toolbar for its use on other devices.

Adding and deleting tools - By pressing
ctrlandleft-click-dragon any tool from the other toolbars, you can add the tool to the popup toolbar. To delete the tool from toolbar, pressshiftkey andleft-click-dragthe icon.

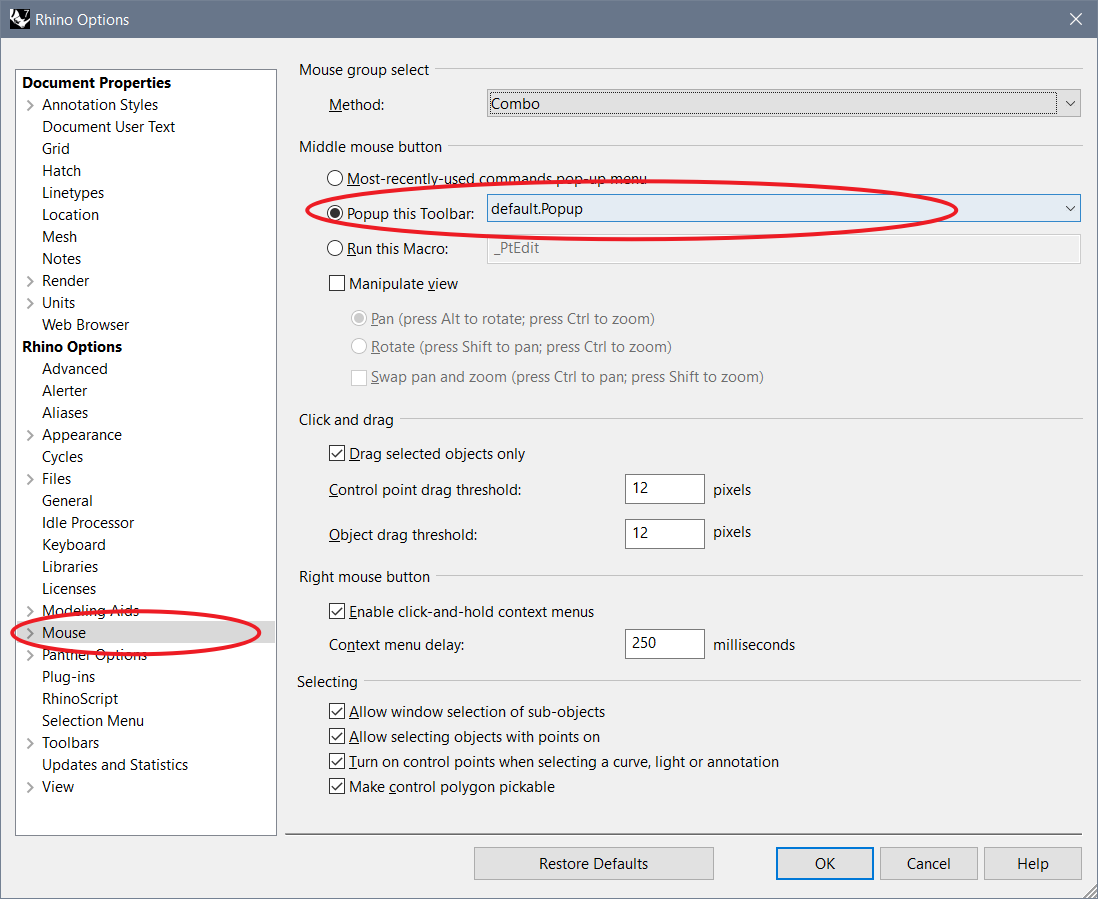
In case of error that the toolbar deesn't popup properly, you can check the setting:
Tools - Options - Mouse - Middle mouse button - Popup this Toolbarto select the toolbar you want to popup.
Status Bar
The status bar displays the current coordinate system, the current location, the unit, the current layer, and the status bar panes which include several useful functions.

Status Bar Panes

- Cplane - The construction plane/world coordinates toggle.
- x/y/z - The x/y/z location of mouse cursor.
- Unit/Delta - The current units setting. During drawing commands, it displays the distance from last picked point to the current location.
- Layer - If objects are selected, the pane displays the layer of the selected objects. If no objects are selected, the pane displays the current layer.

- Grid Snap - forces the marker to snap on grid intersections.
- Ortho - restricts cursor movements to the points at a specified angle from the last point created. The default angle is 90 degrees. You can temporarily turn this off by pressing shift.
- Planar - helps you model objects in the same projected plane by forcing input to be on a plane normal to the last point you picked its imagined connection to your viewport position.
- Osnap - constrains the marker to an exact location on an object such as the end of a line or the center of a circle. Detail of control options is shown in the following Osnap Control section.
- SmartTrack - is a system of temporary reference lines and points that is drawn in the Rhino viewport.
- Gumball - displays the gumball widget on a selected object facilitating move, scale, and rotate transformations around the gumball origin.
- Record History - records history and updates history-aware objects. With history recording and update turned on, e.g. a lofted surface can be changed by editing the input curves.
- Filter - restrict selection to one or more of the filtered types for one selection only.
Osnap Control

- End - snaps to the end of a curve, line etc.
- Near - snaps onto a curve near the cursor location.
- Point - snaps to a point object or a control point of a line or curve.
- Mid - snaps to the midpoint of a curve, line, polyline segment etc.
- Cen - snaps to the center of a circle, box etc.
- Int - snaps to the intersection or projected intesection of curves, lines, edges etc.
- Perp - snaps perpendicular to a curve.
- Tan - snaps tangent to a curve.
- Quad - snaps to the point on a curve that is at the maximum x or y point relative to the current construction plan.
- Knot - snaps to a knot on a curve or surface.
- Vertex - snaps to a mesh vertex. The only option to snap on a mesh object.
- Project - projects object snaps from the actual snap point to the construction plane.
- Disable - disables osnap.
Graphical explanation of all obeject snaps can be found here.
Panels
The tabbed panels at the right side of the window contain many useful Rhino controls. To open a new panel not yet existing in the sidebar(or closed accidentally), you can go to Panels in the menu bar and select the desired panels. By clicking and draging the tab, you can rearrange the tab's postition or make it a floating window.

Here is a list of commonly used panels:
- Property - manages object properties for the selected objects. For example, you can edit layer, display color and other properties in this tab. For example, when designing models for 3D pringting, often a closed model is needed. You can check if the model is a closed entity by looking into the
Typeor theDetailssection in this tab.- Layer - helps organizing obejects so you can manipulate them all at once or keep track of them in some way. When objects are on a layer, you can turn them all off at once, change their wireframe display color, and select them all with one selection. More info about layer panel will be introduced below.
- Display - controls some of the common properties for the selected display mode, like the background color and transparency.
- Layouts - manages the layouts in the model.
- Named Views - manages the named views list to save, restore, and edit named views.
Command Line and History Window
Typing fullname or shortcuts of commands in command line is another efficient way to access tools in Rhino besides clicking the tool icon,
for example, you can try typing Options and pressing enter or spacebar to confirm the command, then the Options window will be opened.
Above the command line, the command history window records recenlty used commands. Pressing F2 shows the last 500 command lines from the current Rhino session.

- Prompts - When enterting commands, prompts for possible commands will pop up below the command line.
- Options - The command line also displays options and instructions inside a command, taking the command
ExtrudeSrffor example, if you want to have a polysurface without top and bottom surface, clicking theSolidoption and setting it toNo. Therefore, it is always recommended to check info and follow instruction in the command line.- To repeat the last command, you can press press either
spacebar,enterorrightclick(inside viewport).- To cancel commands, just press
ESC.
Navigation
Rhino offers multiple ways to navigate inside the viewports and view the model, the easiest way might be using the mouse with
the left button to select objects and the scroll wheel to zoom in and out and the right button to rotate the view. If you press shift and use
the right button, you can shift the view parallelly.
There are also some tools in the standard section which are designed for navigation and allow you to navigate just using the left button or the touchpad.

- Pan view - (Equivalent:
shift+right button) shifts the location of the view cameral and target parallel to the view plane.- Rotate view - (Equivalent:
shift+right button) rotates the view target around the camera.- Zoom - (Equivalent:
scroll wheel) zooms in or out.- Zoom window - zooms in to selected window.
- Zoom extents - zooms to show all objects (except hidden objects) in the model.
- Zoom selected - zooms to selected objects. Useful for cases when you import or paste an object into model but could not find it because it is far from the current view.
- Undo view change - reverses the recent view changes. Useful for cases when you already set the viewpoint but accidentlly moved it. Note that in this case
ctrl+zdoes not work.

