Interface
Launch Grasshopper
Since Rhinoceros3D version 6, Grasshopper is directly included in Rhino as a
plugin. By typing Grasshopper into the Rhino command line, the plug-in will be
loaded automatically and the main Grasshopper interface will show up:

Launch command (Alternative:
left-clickthe green grasshopper icon in the toolbar)
Canvas

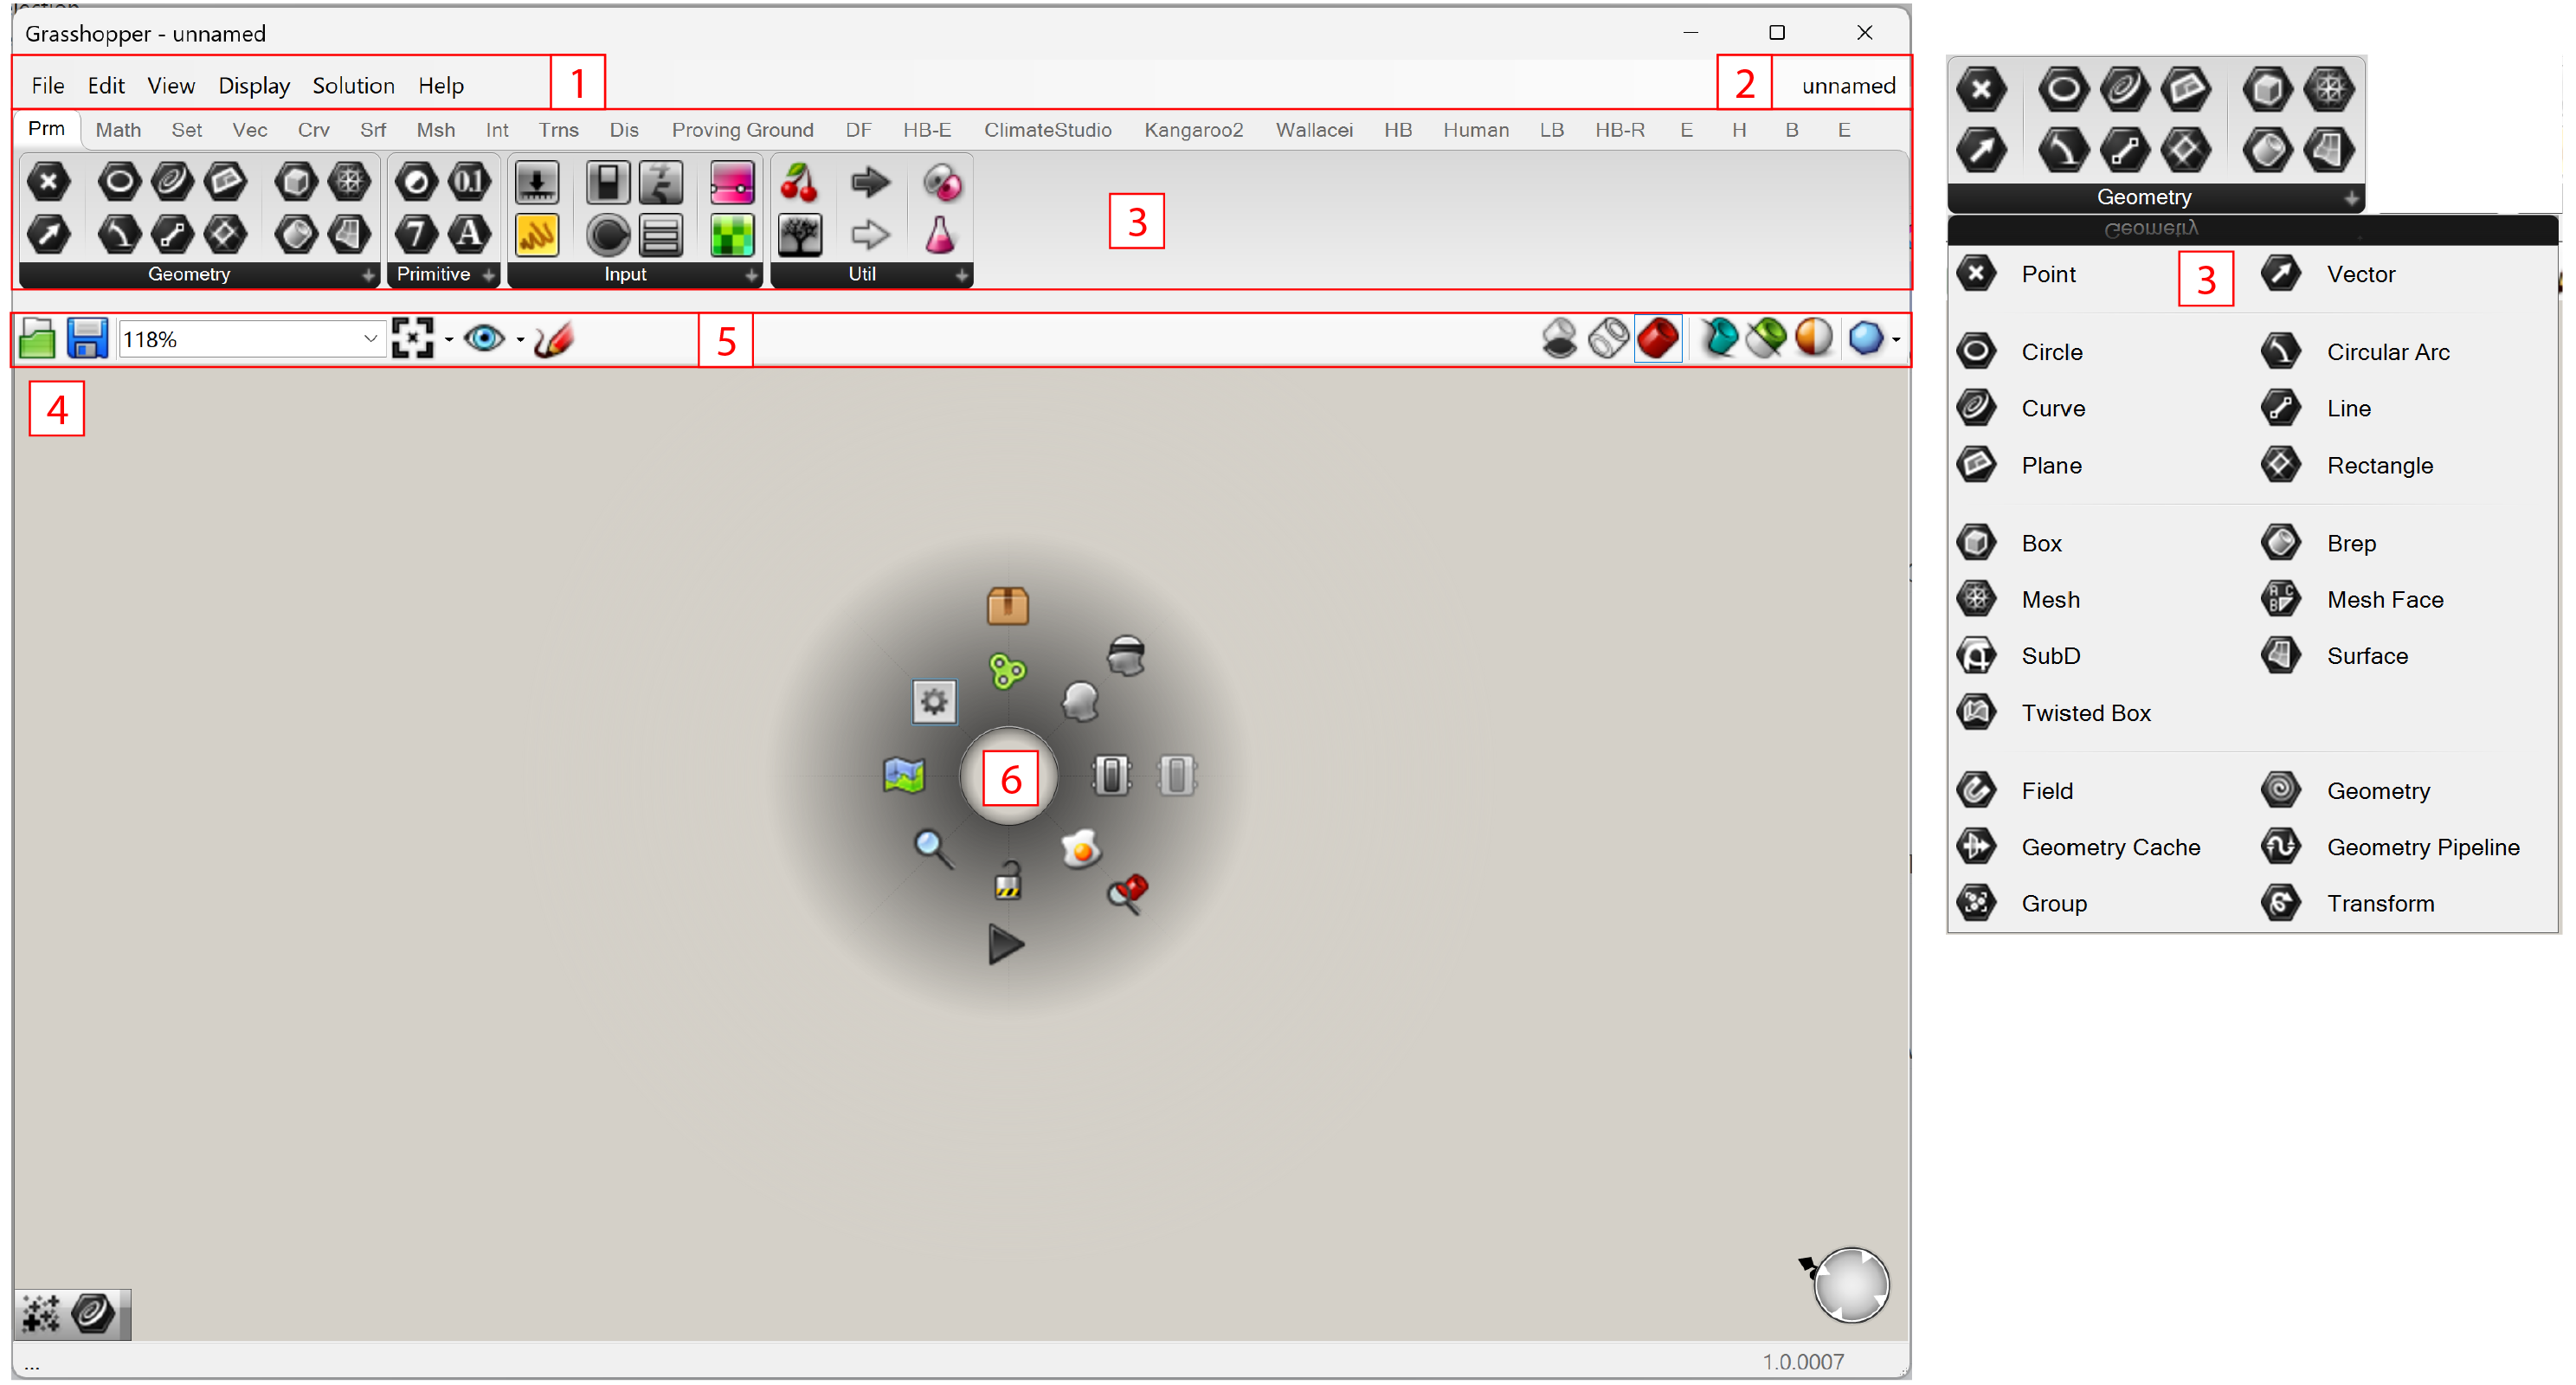
- Main Menu Bar - similar to typical Windows menus. Each menu shows more commands to edit the set tings or the canvas itself as well as the shortcuts to these commands.
- File Browser Control - shows files you are working on and can be used for switching between files.
- Component Panels - list all component categories.
All components belong to a certain category (such asParamsfor all primitive data types orCurvesfor all curve related tools) and all categories are available as unique toolbar panels. The height and width of the toolbars can be adjusted, allowing for more or fewer on-screen buttons per category.
The toolbar panels themselves contain all the components that belong to that category. Since there are a potentially large number of these, it only shows the most recently used items. In order to see the entire collection, you have to click on the bar at the bottom of the Panel. (Image at the right-hand side)- Canvas - the main workplace where all the components will be arranged.
- Canvas Toolbar - quick access to a number of frequently used features, like open and save a file, zoom in and out options, preview geometry options.
- Radial Menu - group, cluster, enable, disable, display, hide and bake components.
Main Menu Bar

- File - allows users to open and save Grasshopper file, export images of the canvas, access to component folders.
- Edit - lists common commands like
Undo,Redo,Cut,Copy,Paste, and more.- View - provides options related to Grasshopper interface. For instance, you can show or hide the canvas toobar and components here.
- Display - manage how components and wires appear on the canvas, including color, icons, names and other graphical attributes. Details of some display options are introduced in the canvas toolbar section.
- Solution - contains the settings for the geometry generated by Grasshopper and made visible in Rhino. Details of functions like
Preview OnandPreview Offare introduced in the radial menu section.- Help - links to resources, documentation, and information about Grasshopper.
Canvas Toolbar

- Open a Grasshopper file (.gh or .ghx)
- Save the current file
- Zoom Factor
- Zoom Extents - offer several zoom options like zoom to selected components.
- View Tool - save current view as named view for future use.
- Sketch tool - The sketch tool works like most pencil-type tools of Photoshop or Windows Paint. Default controls of the sketch tools allow changes of line weight, line type, and color. However, it can be quite difficult to draw straight lines or pre-defined shapes. In order to solve this problem, draw out any sketch line onto the canvas. Right click on the line, and select
Load from Rhino, and select any pre-defined shape in your Rhino scene (This can be any 2d shape like a rectangle, circle, star...etc.). Once you have selected your referenced shape, hit Enter, and your previously drawn sketch line will be reconfigured to your Rhino reference shape.
Grasshopper geometries are displayed dynamically within Rhino's viewports, offering a real-time glimpse of the modeling progression. However, when numerous components are in play, there's a potential for geometries to overlap, leading to obscured or overlapping visualizations. In this case, the following tools can be used to show only the parts you want to see:
- No preview - all geometry in grasshopper will NOT be shown in Rhino.
- Wireframe preview - geometry in grasshopper will be shown in wireframe mode in Rhino.
- Shaded preview - geometry in grasshopper will be shown in shaded mode in Rhino.
- Preview inside boundary - with this tool you can draw a preview boundary on the canvas, and only geometry inside the boundary will be shown. Press ESCAPE to remove any existing boundary.
- Preview on selected geometry - only draw preview geometry for selected objects.
- Preview settings - allows for changing preview colors in Rhino.
- Preview mesh quality - allows for changing preview quality of mesh.
Note: alternatives to displaying and hidding some geometries are using the
Enable PreviewandDisable Previewtools in radial menu.
Radial Menu
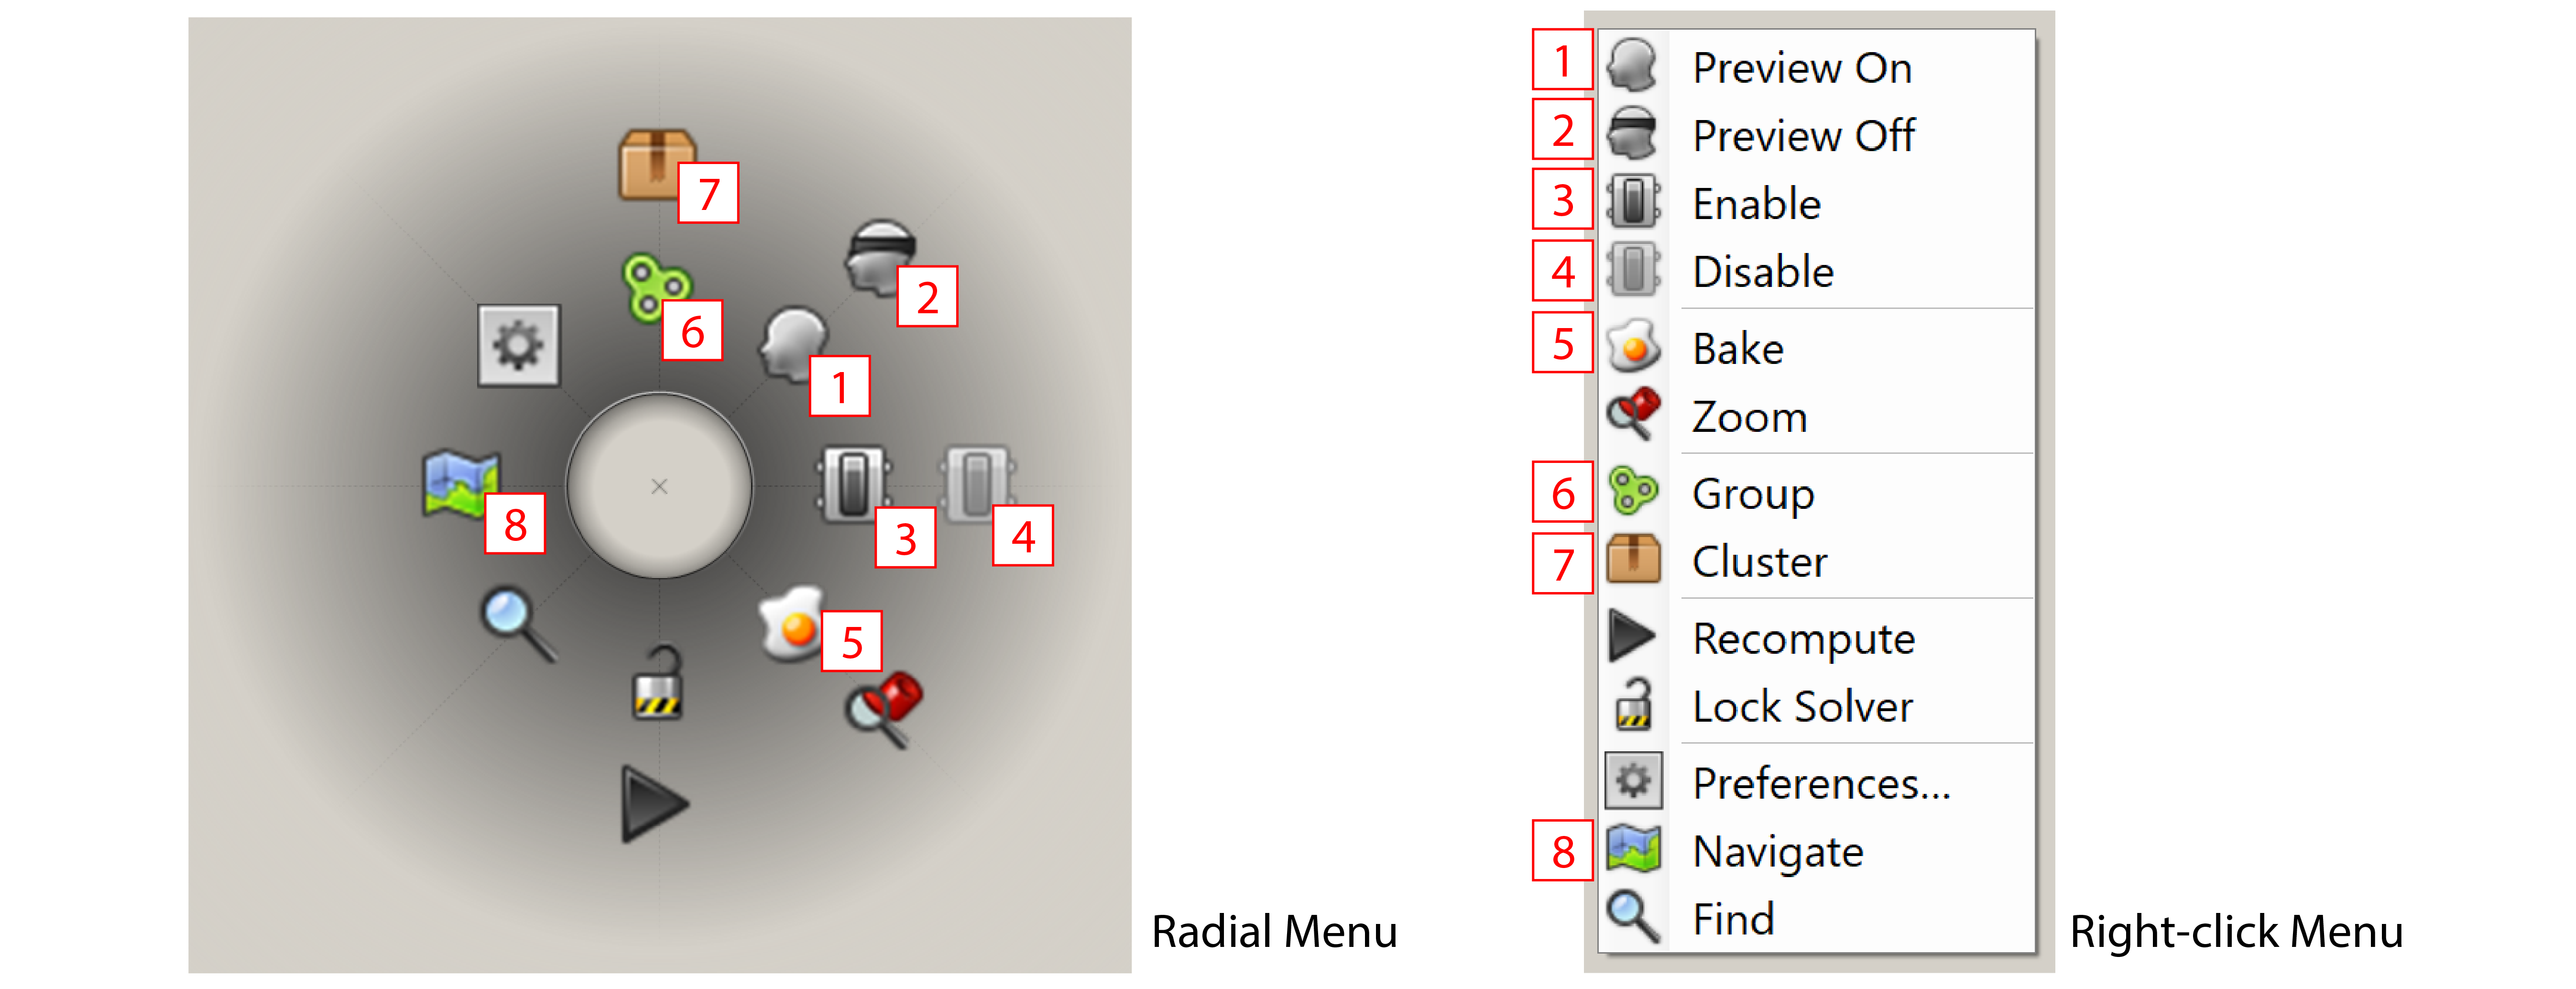
The radial menu, showing up by clicking on the middle mouse wheel, provides useful functions like preview, enable, group and cluster the components.
Those function can alternatively be accessed by right-click in the canvas.

- Preview On - enables preview for the selected objects.
- Preview Off - disables preview for the selected objects.
- Enable - activetes the function of selected objects.
- Disable - halts the function of selected objects. This feature is useful for components that demand intensive computations, such as simulations. When a component is active, any alteration in its inputs triggers a re-computation, potentially hindering the modeling process's speed. To optimize workflow, you can initially disable such components and only activate them once other tasks are complete.
- Bake - converts parametrically generated objects from Grasshopper into the ones in Rhino. More details will be introduced later.
- Group - group selected objects, similar to group function in Rhino.
- Cluster - combine selected objects into one component.
- Navigate - navigates to desired section of the canvas.

